> For the complete documentation index, see [llms.txt](https://docs.ox.security/llms.txt). Markdown versions of documentation pages are available by appending `.md` to page URLs; this page is available as [Markdown](https://docs.ox.security/ox-integrations/3rd-party-integrations/cloud-security/gcp-and-gke-1/gcp-token-and-project-id.md).

# GCP Token & Project ID

Use this authentication method to connect OX to Google Cloud by using a Google Cloud project ID and a service account key. This is the existing connection method and is suitable for environments where long-lived credentials are permitted.

## Prerequisites

* A Google Cloud project with IAM permissions to:
  * Create service accounts
  * Manage service account keys
* Enable required APIs (e.g., Compute Engine API, IAM API, Kubernetes Engine API).
* Optional: `gcloud` CLI installed and configured.

## Step 1: Create a new service account \[Google]

1. Log in to the [Google Cloud Console](https://console.cloud.google.com).
2. Select your GCP project.
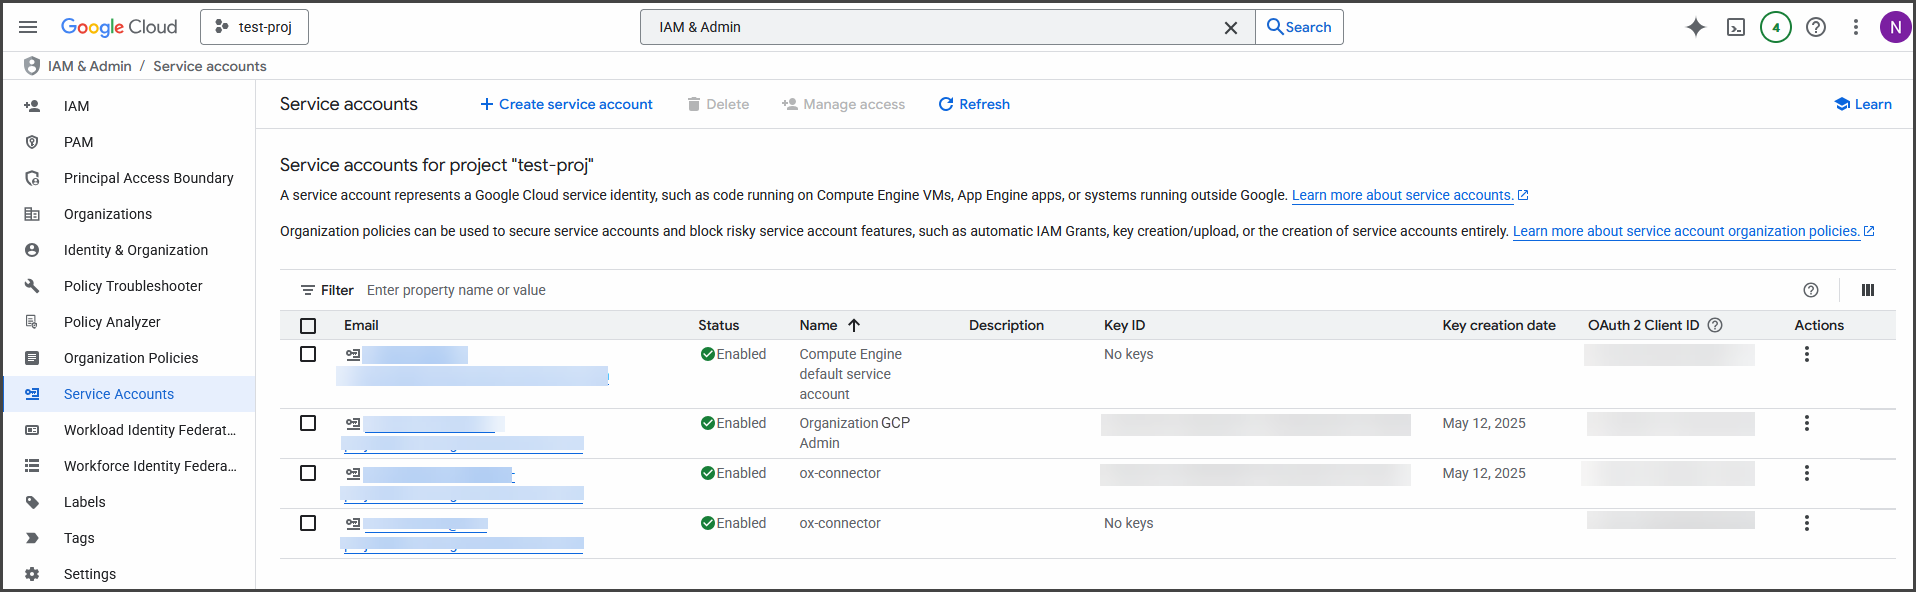
3. Navigate to **IAM & Admin**.
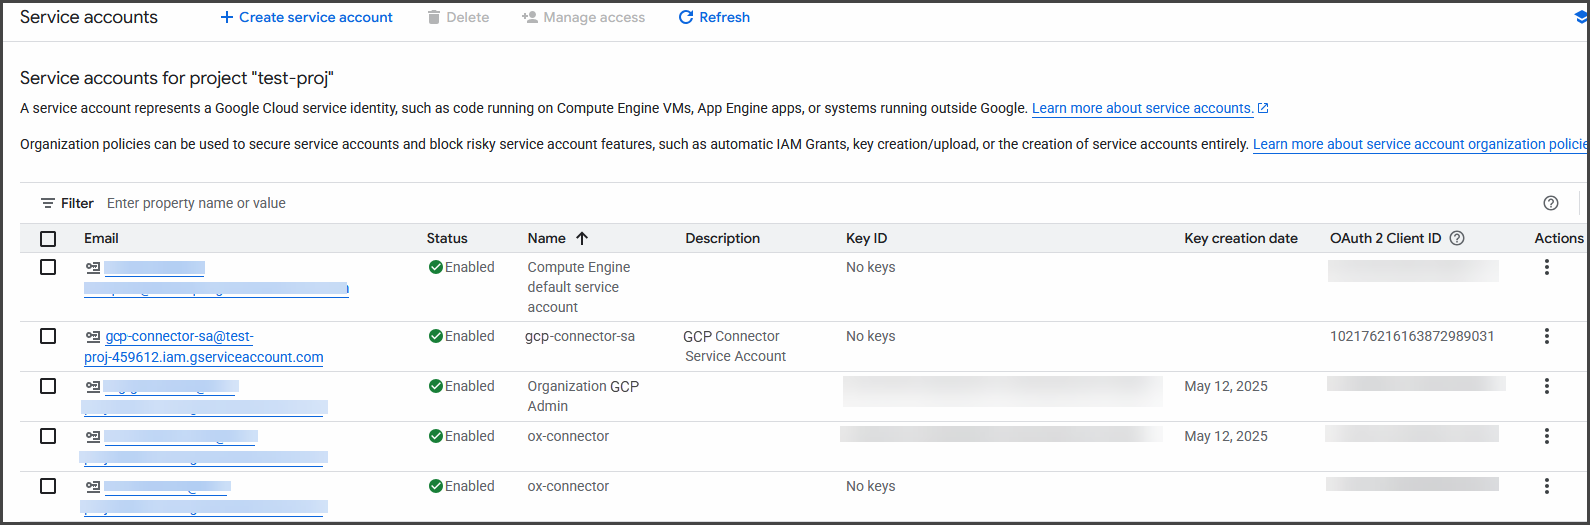
4. Select **Service Accounts**.

<figure><img src="/files/ndGZg4giFwnwfohOAex5" alt=""><figcaption></figcaption></figure>

5. Select **+ Create Service Account**.

<figure><img src="/files/h0uORN0gY51ck9FVZOzw" alt="" width="430"><figcaption></figcaption></figure>

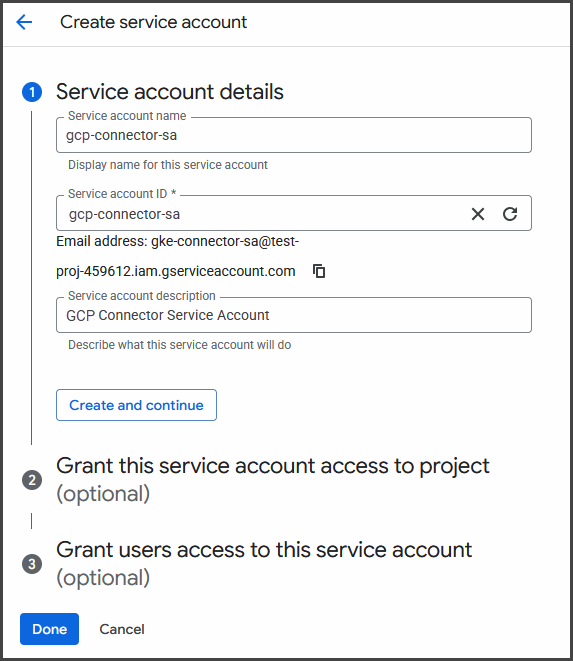
6. Add a meaningful name and an optional description.
7. Select **Create and Continue**.

<figure><img src="/files/nv2odyLW4jiv7bduRv7k" alt="" width="418"><figcaption></figcaption></figure>

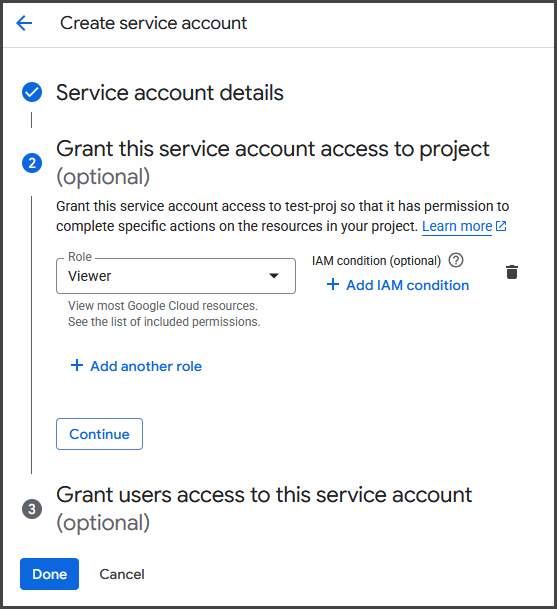
8. Grant one of the following roles:

<table><thead><tr><th width="294.8333740234375">Role</th><th>Description</th></tr></thead><tbody><tr><td><strong>Access Approval Viewer</strong></td><td>Read-only access to Access Approval settings and approval requests.</td></tr><tr><td><strong>Access Context Manager Reader</strong></td><td>Read-only access to Access Context Manager resources, including access policies, access levels, and service perimeters (VPC Service Controls).</td></tr><tr><td><strong>Discovery Engine Viewer</strong></td><td>Read-only access to Vertex AI Search &#x26; Conversation (Discovery Engine) resources.</td></tr><tr><td><strong>Firebase Rules Viewer</strong></td><td>Read-only access to Firebase Security Rules.</td></tr><tr><td><strong>Firebase Viewer</strong></td><td>Read-only access to all Firebase resources and configuration within a project, including databases, hosting, authentication settings, and functions.</td></tr><tr><td><strong>Healthcare Dataset Viewer</strong></td><td>Read-only access to Cloud Healthcare API datasets and their metadata.</td></tr><tr><td><strong>Security Reviewer</strong></td><td>Read-only access to all resources for the purpose of security auditing.</td></tr><tr><td><strong>Storage Object Viewer</strong></td><td>Read-only access to objects within Cloud Storage buckets.</td></tr><tr><td><strong>Viewer</strong></td><td>Read-only access to all Google Cloud resources within a project (basic role).</td></tr></tbody></table>

9. Select **Done**. The new service account appears in the **Service accounts** table.

<figure><img src="/files/Lscy78DqROjJPEdZkzCh" alt=""><figcaption></figcaption></figure>

10. In the **Actions** column, select the newly created service account, click the three dot menu related to it, and select **Manage keys**.
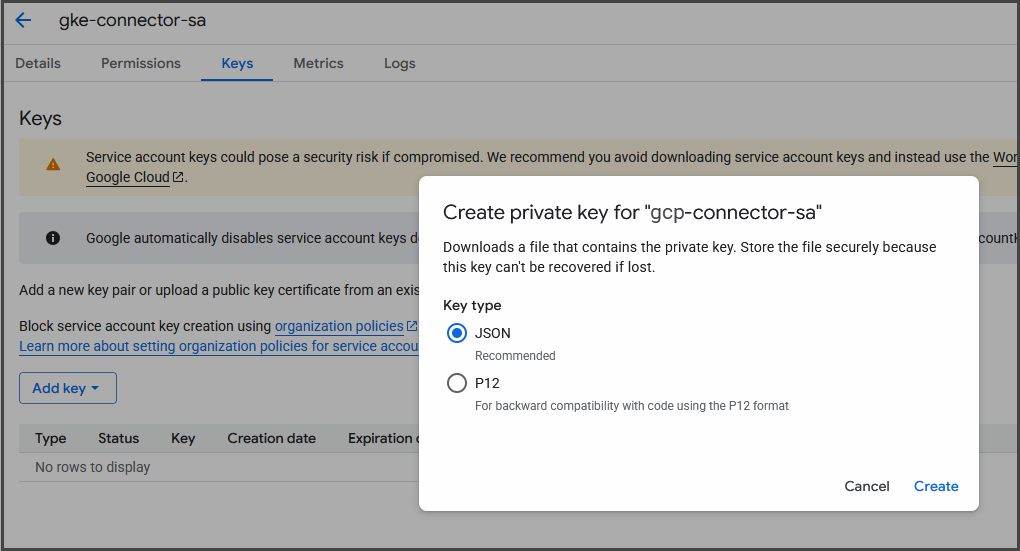
11. In the **Keys** pane, select **Add key > Create new key**.

<figure><img src="/files/kMG5ZTPVEnAOcYORIQfB" alt=""><figcaption></figcaption></figure>

12. Select **JSON** and then select **Create**. The file is automatically downloaded to your system.
13. Securely store the JSON key file.
14. To encode the Key File in Base64:

* On **macOS/Linux**, run: `base64 -i <filename>.json`
* On **Windows**, use a tool or plugin to convert the JSON to a one-line Base64 string.

> **Note:** The Base64 encoding ensures multi-line keys are compacted into a single string.

## Step 2: Enable Google Cloud APIs \[Google]

1. In the **Google Cloud Console**, navigate to **APIs & Services**.
2. In the left pane, select **Library**.
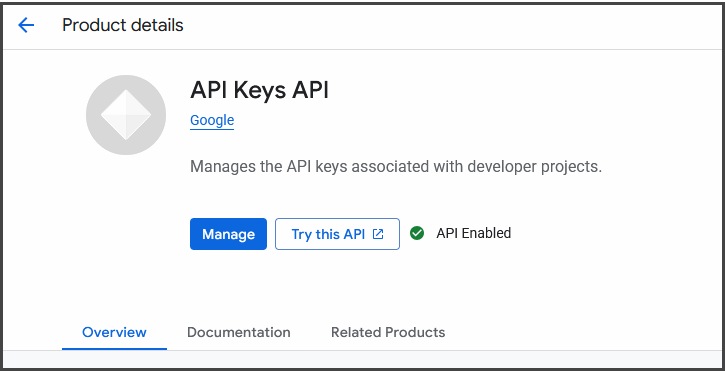
3. Search for and enable the following APIs:

* Compute Engine API (`compute.googleapis.com`)
* Kubernetes Engine API (`container.googleapis.com`)
* Cloud Resource Manager API (`cloudresourcemanager.googleapis.com`)

<figure><img src="/files/NXQUf4jYcWTIbvHvxgHA" alt="" width="544"><figcaption></figcaption></figure>

4. Alternatively, use the `gcloud` CLI to enable all the required APIs at once:

```bash
    gcloud services enable \
  aiplatform.googleapis.com \
  appengine.googleapis.com \
  artifactregistry.googleapis.com \
  bigquery.googleapis.com \
  cloudfunctions.googleapis.com \
  cloudkms.googleapis.com \
  cloudresourcemanager.googleapis.com \
  compute.googleapis.com \
  container.googleapis.com \
  containerregistry.googleapis.com \
  dataproc.googleapis.com \
  datastore.googleapis.com \
  discoveryengine.googleapis.com \
  dns.googleapis.com \
  firebase.googleapis.com \
  firebasedatabase.googleapis.com \
  firebaserules.googleapis.com \
  firestore.googleapis.com \
  healthcare.googleapis.com \
  iam.googleapis.com \
  logging.googleapis.com \
  monitoring.googleapis.com \
  pubsub.googleapis.com \
  redis.googleapis.com \
  run.googleapis.com \
  secretmanager.googleapis.com \
  spanner.googleapis.com \
  sqladmin.googleapis.com \
  storage.googleapis.com
```

> **Note:** The CLI command enables a broader set of APIs than the minimum required for GKE. The additional APIs (such as BigQuery, Cloud KMS, and Dataproc) support other GCP features that OX Security may scan. If you prefer to enable only the minimum required APIs, use the manual UI steps in step 16c above.

5. To verify the APIs were enabled, run:

```
gcloud services list --enabled
```

## Step 3: Connect to GCP

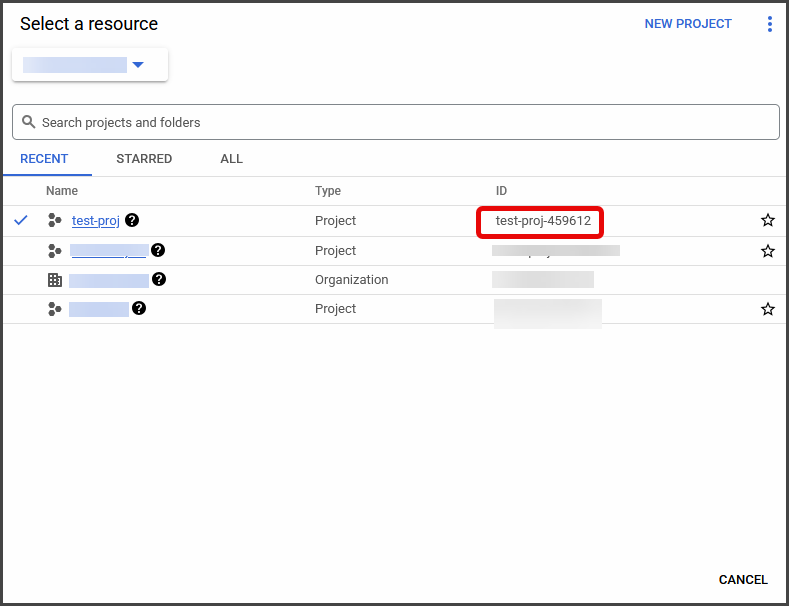
1. In the **Google Cloud Console**, locate the ID of the project in which you have created a service account.

<figure><img src="/files/r4eL4ElM8jUnOGkxEzbg" alt="" width="563"><figcaption></figcaption></figure>

2. In the **OX Security** platform, go to **Connectors** and search for **GCP**.

<figure><img src="/files/L6p5rRrD8w2fBiOSDGFj" alt="" width="155"><figcaption></figcaption></figure>

3. Select **GCP** and set the following parameters in the **Configure your GCP credentials** dialog.

<figure><img src="/files/iKDyDige1F5Miy46V7WI" alt="" width="512"><figcaption></figcaption></figure>

| Parameter         | Description                    |
| ----------------- | ------------------------------ |
| **Project ID**    | Copy the value from the step 1 |
| **API** **Token** | Base64-encoded key             |

4. Select **CONNECT**. A success message appears.

## Multi-project access

**To reuse one service account across multiple GCP projects:**

1. [Create a new service account.](#step-1-create-a-new-service-account-google)
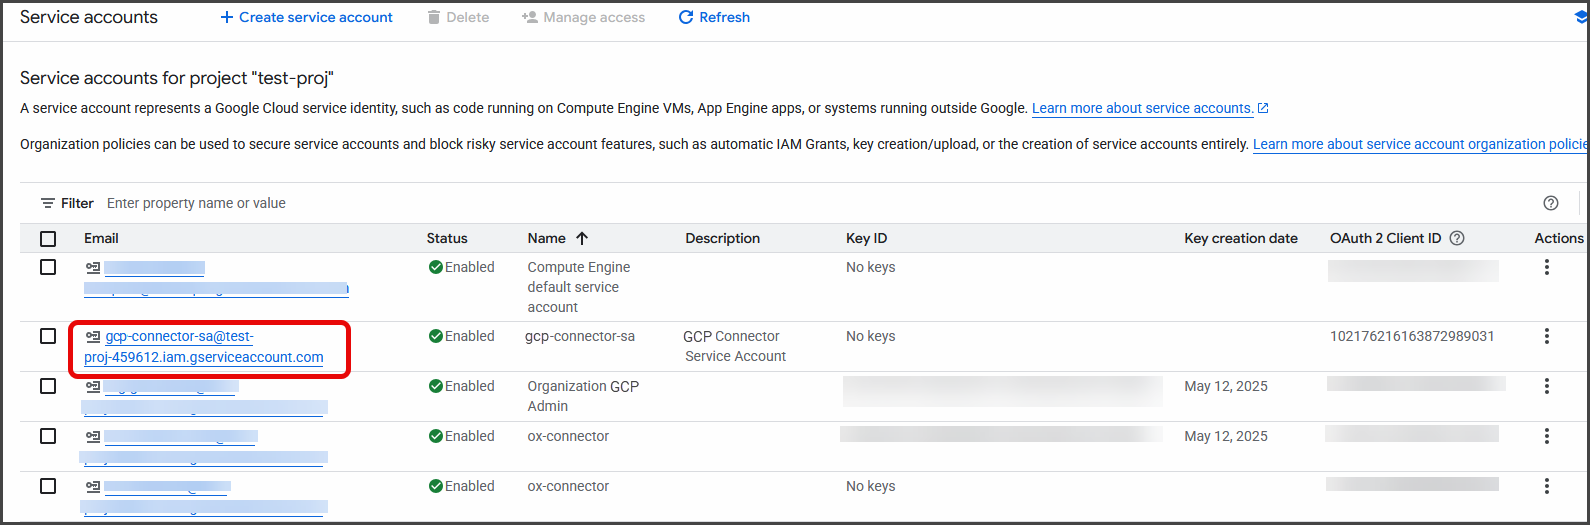
2. In the source project, copy the email of the service account.

<figure><img src="/files/5JJiMQdY8XvKJ6fOJjrr" alt=""><figcaption></figcaption></figure>

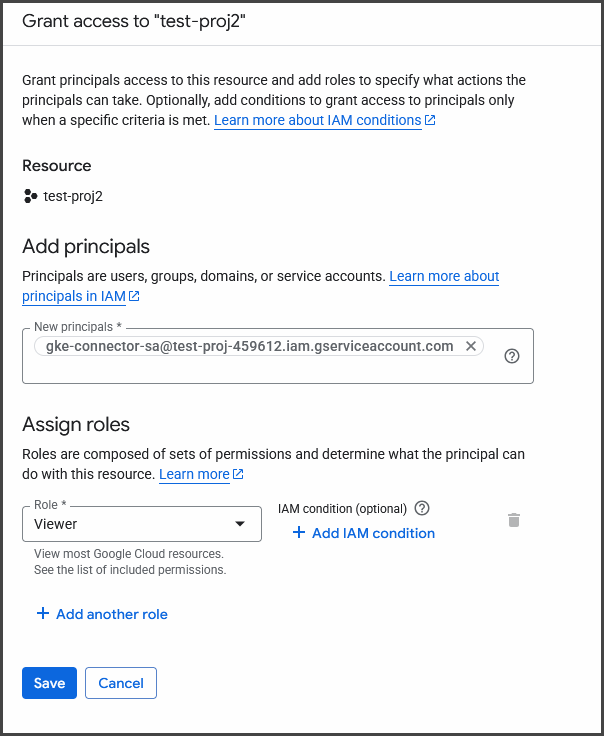
3. For each target project, navigate to **IAM & Admin** and select **Grant Access**.

<figure><img src="/files/DJHrsEuGtDLvOh91g40n" alt="" width="453"><figcaption></figcaption></figure>

4. In the **New principals** box, add the copied email address.
5. In the **Role** box, select the role that you want:

<table><thead><tr><th width="294.8333740234375">Role</th><th>Description</th></tr></thead><tbody><tr><td><strong>Access Approval Viewer</strong></td><td>Read-only access to Access Approval settings and approval requests.</td></tr><tr><td><strong>Access Context Manager Reader</strong></td><td>Read-only access to Access Context Manager resources, including access policies, access levels, and service perimeters (VPC Service Controls).</td></tr><tr><td><strong>Discovery Engine Viewer</strong></td><td>Read-only access to Vertex AI Search &#x26; Conversation (Discovery Engine) resources.</td></tr><tr><td><strong>Firebase Rules Viewer</strong></td><td>Read-only access to Firebase Security Rules.</td></tr><tr><td><strong>Firebase Viewer</strong></td><td>Read-only access to all Firebase resources and configuration within a project, including databases, hosting, authentication settings, and functions.</td></tr><tr><td><strong>Healthcare Dataset Viewer</strong></td><td>Read-only access to Cloud Healthcare API datasets and their metadata.</td></tr><tr><td><strong>Security Reviewer</strong></td><td>Read-only access to all resources for the purpose of security auditing.</td></tr><tr><td><strong>Storage Object Viewer</strong></td><td>Read-only access to objects within Cloud Storage buckets.</td></tr><tr><td><strong>Viewer</strong></td><td>Read-only access to all Google Cloud resources within a project (basic role).</td></tr></tbody></table>

6. Click **Save**.
7. In the **OX Security** platform, go to **Connectors** and search for **GCP**.
8. Select **GCP** and set the following parameters in the **Configure your GCP credentials** dialog.

<figure><img src="/files/iKDyDige1F5Miy46V7WI" alt="" width="512"><figcaption></figcaption></figure>

| Parameter         | Description        |
| ----------------- | ------------------ |
| **Project ID**    | Add \*             |
| **API** **Token** | Base64-encoded key |

9. Select **CONNECT**. A success message appears.


---

# Agent Instructions
This documentation is published with GitBook. GitBook is the documentation platform designed so that both humans and AI agents can read, navigate, and reason over technical content effectively. Learn more at gitbook.com.

## Querying This Documentation
If you need additional information that is not directly available in this page, you can query the documentation dynamically by asking a question.

Perform an HTTP GET request on the current page URL with the `ask` query parameter, and the optional `goal` query parameter:

```
GET https://docs.ox.security/ox-integrations/3rd-party-integrations/cloud-security/gcp-and-gke-1/gcp-token-and-project-id.md?ask=<question>&goal=<endgoal>
```

`ask` is the immediate question: it should be specific, self-contained, and written in natural language.
`goal` is optional and describes the broader end goal you are ultimately trying to accomplish on behalf of the user. GitBook uses it to tailor the answer towards what is most useful for that goal.

The response will contain a direct answer to the question and relevant excerpts and sources from the documentation.

Use this mechanism when the answer is not explicitly present in the current page, you need clarification or additional context, or you want to retrieve related documentation sections.